It has long been established that high resolution cylindrical
panoramas with large horizontal dimensions (> 5000 pixels) can be created
from single rows of images using stitching software like Apple's QTVRAS.
Using large focal lengths results in high resolution, and stitching is
usually fast and accurate. It turns out that multirow stitching, which
is required for spherical/cubic panoramas, is infinitely more complex,
and requires adjustments of many more parameters. This explains why only
few software solutions are available for this kind of task. It is also
more sensitive to slight misalignments, and finally, photographing the
source images requires bulky and expensive equipment. For this reason most
spherical images are made using fisheye lenses which, however, are limited
in resolution. For practical purposes and as a rough guide, one can expect
about 2500-3000 pixels maximum useful panorama width for 8mm lenses and
6000 pixels for 15mm fisheye lenses. The limiting factor is the poor corner
resolution of these optics. Rectilinear lenses also degrade in the image
corners, but this affects panorama quality much less due to the difference
in projection characteristics: Rectilinear images get compressed in the
corners during remapping to the standard panoramic formats, while this
is not the case for fisheye images. In effect, rectilinear lenses exhibit
an almost constant angular resolution while fisheye lenses degrade in the
corners. Finally, fisheye lenses are often heavy, while the Heliar
15mm lens is very small and compact. It occupies about 1/4 of the volume
of the 15mm Sigma fisheye, which itself belongs to the more compact lenses
of its type. 8mm lenses are still larger than these.
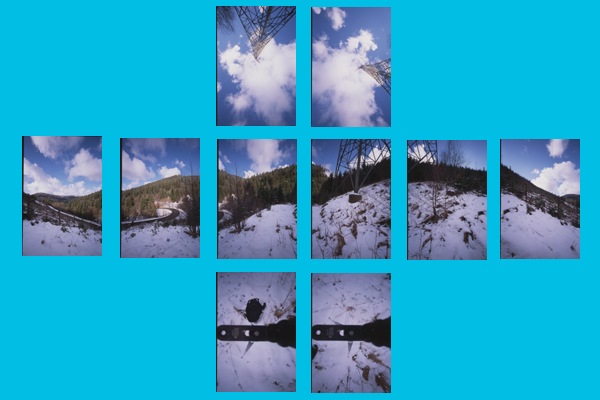
The 15mm rectilinear lens in portrait orientation nominally exhibits 77° horizontal and 100° vertical field of view on 36mm x 24mm film area. To cover a full spherical view it would be sufficient to create two rows of images, one slightly tilted up and one tilted down. It turns out that it is more practical to use three rows: One horizontal, one vertical up and one vertical down. This is more flexible and also simpler to stitch. One might use just the horizontal row, if a cylinder is sufficient. One might add the zenith images without the nadir images depending on the scene, etc. As a minimum, the following set of images is required for a full sphere (All images in portrait orientation):
If life-scenes with people and moving objects are photographed it may be advisable to take more images.6 horizontal images (at pan angles 0°, 60°, 120°, 180°, 240°, 300°) 2 images vertically up (at pan angle 0° and 90°) 2 images vertically down (at pan angle 0° and 90°)
It is important that the full film area (36mm x 24mm) is used as source image. Unfortunately, standard slides mask an area of roughly 23 x 35mm, as do many transparency holders in desktop scanners. This also works but only barely covers the full spherical view and requires very careful alignment of the camera setup. It is better to make an enlarged transparency holder by filing away one millimeter of a standard slide frame, and scanning the images using this frame.
Additional Equipment
A panorama head capable of controlled two axis alignment is required which ensures that the front nodal point of the lens remains at a constant position. Commercially available solutions exist but do not meet my requirements of small size and light weight. However, it is not too difficult to assemble a suitable setup using mostly standard equipment, see the following images:

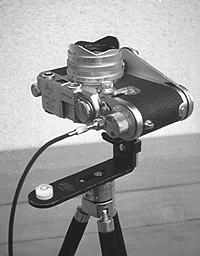
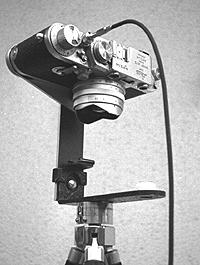
Horizontal panning is provided by a panorama head (1) with click stops at fixed angular positions.In this case a small yet quite accurate Leitz model is used which unfortunately is no longer being produced. Current designs are often bulkier and less precise. Next to that comes a bracket (2) which aligns the camera in portrait orientation with the lens positioned above the rotational axis. These devices are also readily available. Finally, the camera body is retracted by a few mm to position the nodal point of the lens into the axis of rotation, and an additional horizontal pivot (4) is added to provide vertical tilting. This is realized by two small aluminum profiles (3,4), which are cut and drilled according to the dimensions of the camera body used.
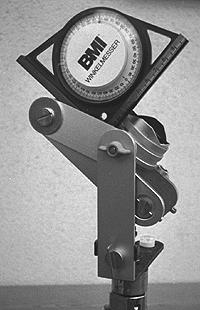
With the aid of a gravity operated angular gauge, any vertical tilt angle may be accurately adjusted by turning the camera around pivot (4). For the scheme described in this article, only horizontal and vertical positions need to be fixed, which does not require angular measurements: A simple spirit level suffices.
The camera body is an old Leica IIIf, which accepts the M39 screw mount of the Heliar lens. Of course, any M39 body could be used, e.g. the Bessa cameras sold by Cosina together with their lenses. The Leica has the advantage of being significantly smaller than the Bessa, and by just adding the tiny collapsible 50mm Elmar lens provides a setup for "normal" photography.
Adding a foldable tripod completes the setup which fits
into a volume of only 24cm x 14cm x 5cm including the auxiliary 50mm lens.
Total weight is less than 1.5kg.
Source Images
The following table exhibits a set of example images which are used as source for a full spherical panorama.
The Heliar lens exhibits significant light
fall off in the corners which is partially due to the nearly symmetric
optical design. The exact amount depends on the aperture size and becomes
less significant when stopping down. However, stopping down too much softens
the image and reduces overall resolution. A good compromise is f8, see
this
review for a discussion of the optical characteristics of the Heliar
lens. Since the camera is used on a tripod, this aperture can be used in
almost any situation, which helps to standardize processing.
This light fall off needs to be corrected prior to stitching, otherwise each source image will remain clearly distinct in the final panorama. This can be done using the Panorama Tools plug-in Correct with the Radial Luminance option. The parameter used for correction corresponds to the difference in brightness level of center and horizontal edge pixels. In this case a value of 35 (portrait orientation) yielded best results. The optimum parameter changes depending on the film used and is certainly different for other apertures. The left image below shows the original scan, while the right image has been processed by the Correct filter.
Stitching
Large panoramas are significantly more difficult to stitch than small panoramas. The reason is that stitching errors become visible if they correspond to a few pixels mismatch (often 1 pixel error is quite visible), and this visibility is virtually independent of panorama size. However, 1 pixel error corresponds to much smaller angular misalignment in an 8000 pixel panorama than in an 1500 pixel version. This accuracy requirement exceeds common photographic standards, and is not routinely offered by consumer or professional optics. To give some examples:
- Lens distortions are considered very low if they are less than 1%. The associated error in large panoramas exceeds 20 pixels.
- A very good panorama head might provide angular accuracy of 0.3°. The associated error is 7 pixels.
- Shift of the optical axis relative to the image center is often quite significant. Many factors contribute to this error, the largest one being the undefined masking of the image in the scanner.The error easily exceeds 50 pixels.
- Movements of the lens nodal point between images causes parallax errors, e.g. movement of 1cm causes an error of 2 pixels for an object in 5m distance. It should be added that wide angle lenses, especially fisheye lenses, have no fixed nodal point in the sense of a pinhole camera, which introduces unavoidable and incorrectable errors. Mismatch of images due to this effect can only be hidden or retouched away.
To summarize: Standard photographic equipment is not
made for large panoramas and photogrammetric equipment should really be
used but is way too expensive for most applications. It remains the task
of the processing software to figure out as many of the errors as possible
(PTOptimizer), and then try to compensate them (PTStitcher).
Processing with PTStitcher requires an optimized script.
This is an example script for the setup described above. It is discussed
step by step in the following chapter, however, some familiarity with the
software is assumed.
p f2 w6000 h3000 v360 n"PSD_mask"
i f0 w2592 h3888 y0 p0 r0  v76 n"Image0.tif"  a0 b-0.002 c0 d0 e0  g0.1 t0.1
i f0 w2592 h3888 y66.7 p0 r0  v=0 n"Image1.tif"  a0 b=0 c0 d0 e0  g=0 t=0
i f0 w2592 h3888 y120 p0 r0  v=0 n"Image2.tif"  a0 b=0 c0 d0 e0  g=0 t=0
i f0 w2592 h3888 y-173.3 p0 r0  v=0 n"Image3.tif"  a0 b=0 c0 d0 e0  g=0 t=0
i f0 w2592 h3888 y-120 p0 r0  v=0 n"Image4.tif"  a0 b=0 c0 d0 e0  g=0 t=0
i f0 w2592 h3888 y-53.3 p0 r0  v=0 n"Image5.tif"  a0 b=0 c0 d0 e0  g=0 t=0
i f0 w2592 h3888 y26.7 p90 r0  v=0 n"Image6.tif"  a0 b=0 c0 d0 e0  g=0 t=0
i f0 w2592 h3888 y120 p90 r0  v=0 n"Image7.tif"  a0 b=0 c0 d0 e0  g=0 t=0
i f0 w2592 h3888 y120 p-90 r0  v=0 n"Image8.tif"  a0 b=0 c0 d0 e0  g=0 t=0
i f0 w2592 h3888 y26.7 p-90 r0  v=0 n"Image9.tif"  a0 b=0 c0 d0 e0  g=0 t=0
v v0 b0 d0 e0 g0 t0
v y1 p1 r1 d1 e1
v y2 p2 r2 d2 e2
v y3 p3 r3 d3 e3
v y4 p4 r4 d4 e4
v y5 p5 r5 d5 e5
v y6 p6 r6 d6 e6
v y7 p7 r7 d7 e7
v y8 p8 r8 d8 e8
v y9 p9 r9 d9 e9
The first line describes the target panorama
p f2 w6000 h3000 v360 n"PSD_mask"
which should be equirectangular format (f2) 6000 pixels
wide and 3000 pixels high with 360° field of view.The image file format
is Photoshop with stitching masks.
The input images are described by the paragraph of 'i'-lines, e.g.
i f0 w2592 h3888 y0 p0 r0 v76 n"Image0.tif" a0 b-0.002 c0 d0 e0 g0.1 t0.1
These images are rectilinear format (f0). They are
scanned with 2720dpi resolution (Canon 2700F) which yields images sized
2592 x 3888 pixels. The angular orientation of the image is described by
the horizontal pan angle (yaw = 0°, y0), vertical tilt angle (pitch
= 0°, p0) and the rotational angle (roll = 0°, r0). Horizontal
field of view amounts to 76°. A distortion correction is attempted
by specifying one parameter of a radial correction polynomial (b-0.002).
The position of the optical axis relative to the center of the image needs
to be adjusted, which is specified by parameters d0 and e0, and finally
a shear correction of the images is proposed (g0.1 t0.1) which corrects
for misaligned scanner hardware.
The parameters specified here are starting values for the subsequent optimization. The pan angles in this example script do not follow the equidistant values proposed above (y=0, 60, 120,..). A slightly different series had to be used because these were the values provided by the panorama head.
The lines starting with 'v' depict the variables to be optimized. A set of control points has to be specified, either manually or using one of the pixel selection tools (PTPicker, ControlPoints, PixelPicker ). It is recommended to optimize a subset of the variables, and readjust the starting values before increasing the number of variables to optimize.
This process is time consuming and requires frequent reaximination of control points, trials with different sets of variables and readjustments of starting values. It should be noted, that optimization of just the 6 cylinder images is much simpler. In this case, only 3-5 control points per imagepair have to be choosen. No lens distortion correction and shear is required, and one may even get by without optimizing the position of the optical axis. Full spherical views require more control points and the full set of variables.
It does not help to first stitch the cylinder and then add top and bottom. Quite to the contrary, it prooved impossible to adjust these images later. The images need to be positioned simultaneously.
In my tests the accuracy of the fit was much better than what I usually get with fisheye lenses. After some experimenting the average control point distance after optimization always reached 1 pixel error, even for very large target panorama sizes (8000 pixels width). For cylinders and fewer parameters, the optimization is even better. According to the optimization, the Heliar lens has a horizontal field of view of 76.2° which corresponds to an apparant focal length of 15.4mm.
The final panorama still requires some image manipulations which is faciliated by using the Photoshop multilayer file format. Main errors are due to changes during the few seconds it takes to photograph the scene like moving clouds, lighting changes etc. Standard processing of scanned images like unsharp masking and colour/contrast changes should not be applied before the final flattening of the image has taken place since it might introduce visible seams.
The example panorama compressed and scaled to 2500 pixels
width can be viewed on the next page.
Conclusions:
A small and light setup for high resolution VR-imaging has been proposed. It is suitable for 8000 x 4000 pixel full spherical/cubic panoramas using 10 input images.
Copyright 2002 © Helmut Dersch der@fh-furtwangen.de