PTEditor is a tool for inserting source photographs into panoramic images, and for extracting rectilinear views from panoramic images. PTEditor may be used for editing existing panoramas, eg retouching areas of an image or pasting other images into panoramas. PTEditor may also be used to assemble panoramic images from individual source photographs. Each source image can be independently aligned with respect to pan, tilt, roll and field-of-view angles, and remains editable throughout the session. The result is interactively displayed in a panoramic viewer at all times. The output of PTEditor is either a finished panoramic image, or a script-file for further processing in other programs like PTPicker or PTStitcher.
Installation:
A recent version of the Sun Java Runtime must be installed. Install the library pano12.dll (Windows)/ pano12.lib(MacOS) from the PanoTools distribution.
Note: If you can not see pano12.dll make dlls visible in Windows Explorer.
PTEditor is started by double-clicking PTEditor.jar. There
is no '.exe' file. Alternatively, PTEditor may be started by using a DOS-commandline
'java -jar pteditor.jar'. In this case command line options may be supplied
to control the Java Runtime. This may be useful to increase memory.
Panorama Creation:
The creation of VR-panoramas usually requires the
assembly of several input images to one file, the so called environmental
map. This file is an image itself, which maps a full 360° x 180°
view to a flat surface. Often an equirectangular mapping algorithm is used,
which uses pan (-180°...+180°) and tilt
(-90°...+90°) as independent coordinates. The
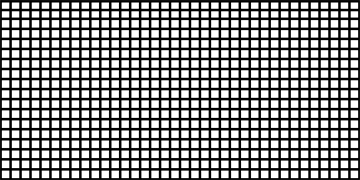
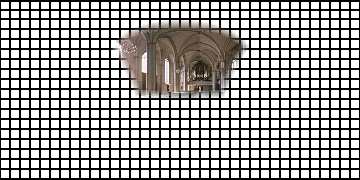
following image is an empty panorama canvas as used by PTEditor. The evenly
spaced grid with spacing of 10° in both horizontal and vertical direction
aids in orienting the viewer.
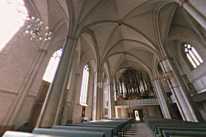
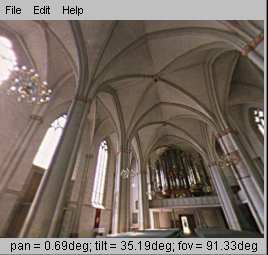
The view presented by the built-in viewer, which is identical to the applet 'PTViewer', depends on the choosen pan, tilt and field-of-view angles. One particular view might look like this image
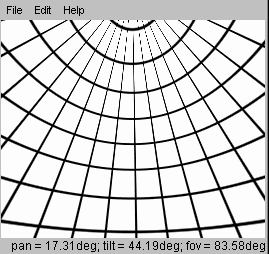
This is an actual screenshot, which displays the choosen angles. This is accomplished by pressing the key 'v'.
Tutorial Example:
Source Images
For this tutorial example a series of 10 rectilinear images are used. These are simulated and created using Panorama Tools. They resemble photographs taken with 35mm equipment using a lens with 18mm focal length. Lenses with this focal length are readily available for most camera systems. To follow this tutorial, download these images from here.
To cover a full spherical view, 10 images suffice. These
images consist of two rows (landscape mode) of four each, one tilted up
by 30°, the other tilted down by -30°. Additionally, there is one
image pointing vertically up, and one pointing down.
 |
 |
||
 |
 |
 |
 |
 |
 |
 |
 |
Processing
Launch PTEditor. Open the File menu and choose New. This creates an empty panorama canvas as shown above. The viewer window exhibits an extracted part similar to the image above, which can be interactively moved to any viewing angle. The controls are identical to the Java applet PTViewer: Movements are controlled either by the mouse, or by the keyboard (arrow keys, +, -).
Notice that the Edit menu, which was greyed when the application started, is now active. Open it and choose Load New Image. A file dialog comes up, which you should use to load the file Image_01.jpg of the tutorials package. Then the following window is displayed:
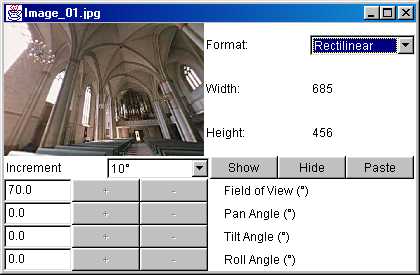
This window consists of a thumbnail version of the input image, which is there for identification purposes. Then there are several entries which control the positioning of this image in the panorama. At this stage nothing is seen in the viewer yet.
The Format menu allows you to select the lens type, which can be either of rectilinear, full-frame fisheye or circular fisheye. Choose rectilinear for this tutorial. Width and height are displayed in pixel dimensions for information and can not be changed. The image position data (field of view, pan, tilt and roll angles) correspond to the currently selected viewer position. At this stage, they can be changed only via the text fields. Enter 102.79 for Field of View, 0 for Pan Angle, 30 for Tilt Angle and 0 for Roll Angle.
Now press Show, and the image is inserted in the panorama. The viewer can be used to pan and tilt through the partial view provided by this image. However, the image is not fixed at the current position, and is only overlayed over the background panorama: It can still be manipulated using the controls in the image window. Pressing Show has changed this window also: Now the + and - buttons are activated and can be used to change the respective angles. Try each of them to see the effect. If the controls are too coarse, you can set the Increment in steps down to 0.001 degrees. The textfield input still works, but will become valid only after hitting Show again. Note that the Format field is now greyed: It is not possible to change Format after Show has been clicked. If you accidentally used a wrong format, close the image and reopen it. You can use Hide to hide this image, which is useful when working with several images at once.
Change viewing positions to the values stated above and click Show again.. There are now three ways to proceed:
You can save the positions found in this session in a
scriptfile which is compatible with PTPicker and PTStitcher. To create
this scriptfile choose File->Save Script As. The scriptfile uses
the Panorama Tools syntax. For this example it should look like:
p f2 w1500 h750 nTIFF

i f0 v102.79 y0.0 p30.0 r0.0 n"Image_01.jpg"
o f0 v102.79 y0.0 p30.0 r0.0Note: This scriptfile has to be located in the same directory as the image file Image_01.jpg to work correctly.
Close PTEditor and relaunch it. Then click File->Open Script and choose the previously saved scriptfile. This should create the grid as well as the image window. Click Show to restore the state where you saved the scriptfile. The same scriptfile can be used for PTPicker to accurately align source images (which obviously doesn't make sense with just one image) or for PTStitcher to create a panorama.
The second way to continue leads to panoramic images without
any intermediate scripts. With the image window open and the positions
properly set (see above), click Paste after Show. A window
with progress bar comes up indicating the insertion process.
Note: For unknown reasons this progress dialog is sometimes
minimized in the Windows toolbar. Click it to be displayed.
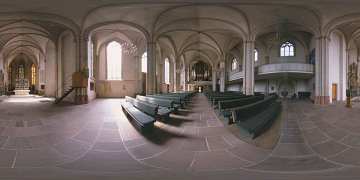
After the insertion is finished, the image window dissapears,
and the image is permanently inserted in the panorama. This panoramic image
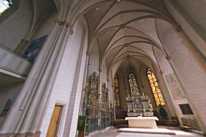
can be saved by clicking File->Save Panorama as. This example yields
the following result:
Finally, the third method saves the image position as
HTML-file. This option is accessed via the Export HTML option in
the File menu. The HTML-file may be used to display the input images
using the ptviewer applet, specifically the ptzoom extension. This may
be used to adjust zoomable images inside panoramas like this example,
or assemble full spherical panoramic views without actually stitching a
panorama like this example. A HTML-file
exported by PTEditor and using a single image is shown below:
<html>
<center>
<applet name=ptviewer archive=ptviewer.jar  code=ptviewer.class width=320 height=200>
<param name=applet0 value="{code= ptzoom.class}{file=Image_01.jpg}{pan=30.0}{tilt=20.0}{rot=0.0}{fov=102.79}">
<param name=inits value="ptviewer:startApplet(0)">
</applet>
</html>
The strength of this method is the ability to adjust
many or all source images interactively, without fixing the positions intermediately.
This can be done using the tutorial example: Open image Image_01.jpg
as described above, and insert (Show) it at the mentioned position.
Now open Image_02.jpg, and adjust it to Pan Angle 90°,
Tilt
Angle 30° and Roll Angle 0°. Note that PTEditor automatically
chooses the same Field-of-view as the first image, although you
might change it if you need to. Show this image also. It is now
possible to adjust one image's position with respect to the other.
You can continue adding more images until the full spherical view is covered. To make this simpler, you can use the scriptfile script_tut.txt of the tutorial: Restart PTEditor, and open this script using File->Open Script. All 10 source images will be loaded subsequently, and can be shown and manipulated as described. The result may be the finished panorama (using the Paste function) or a refined scriptfile (using Save Script). To create a panorama using this scriptfile you need a working installation of Panorama Tools. Simply dropping the scriptfile onto the icon of PTStitcher.exe will create the spherical panorama, which after adjustment should look similar to the image below. If adjustment is still bad, you can use the same script as input file for PTPicker and use the optimizer for further refinement. The full-sized version of the VR-panorama can be viewed as part of the Virtual Tour of Marburg on this site.
A more advanced example is the one supplied for the PTPicker application. This example consists of 7 images taken with a 15mm full-frame fisheye lens. There are versions for PC, Macintosh and Unix/Linux at my website, download the one appropriate for your system. The scriptfile Project.txt can be opened in PTEditor, and all 7 images are loaded. They may then be shown, and manipulated as described for the last example.
PTEditor internally remaps each fisheye image to 6 rectilinear
cubic face images. This remapping takes a few seconds after Show
is pressed. This is displayed in a progress window, which unfortunately
(as in the example above) sometimes remains minimized in the Windows toolbar.
Click to make it visible. This remapping needs to be repeated whenever
the field-of-view angle is changed, so manually adjusting this value
is tedious. Viewing all 7 fisheye images creates 42 internal rectilinear
views. This exceeds the default memory allocation of the Java 1.3 Runtime
(64MB), and a larger value (128MB or more) has to be used, see the additional
notes below about details.
Editing Panoramas
The equirectangular panoramic image can be manipulated in any way using standard editing tools like Photoshop or The Gimp. However, sometimes editing requires perspectively corrected views, eg if text is to be added onto the wall of a building, or zenith and nadir need to be retouched. This can be accomplished using PTEditor:
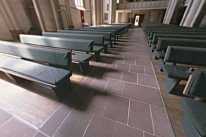
Launch PTEditor and open the panoramic image (eg the one
created in the tutorial example above) using
File->Open Panorama. Use the mouse or keyboard
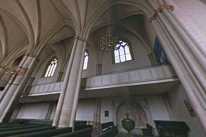
to move to the position which you want to edit. This may be the view displayed
below:
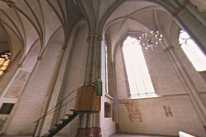
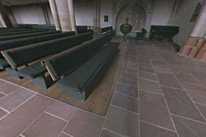
Now choose Edit->Extract Partial View, which brings
up a file dialog. Use this dialog to save the partial view at a convenient
location. This partial view is exactly the view displayed in the viewer
with two differences:
(a) It is scaled to preserve the resolution of the source
panorama
(b) High quality interpolators are used instead of the
faster ones in the viewer.
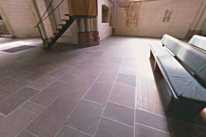
The saved image can then be opened and processed in Photoshop
or any other Graphics program. To insert it back, use Edit->Insert Saved
View, and then save the changed panoramic image via File->Save Panorama.
PTEditor remembers the position data for resinserting the extracted image
in its preferences.
Additional Notes:
Copyright © 2001 Helmut Dersch der@fh-furtwangen.de